

Imagine you get the data you have been waiting for. But the data you have sourced is stored in a format that cannot be opened using spreadsheet software and thus you are unable to process it in any way. What do you do?
The answer is: you scrape it.
Scraping describes the method to extract data hidden in documents – such as web pages, PDFs, or images and make it useable for further processing.
It is among the most useful skills to have if you set out to investigate data – and most of the time it is not especially challenging.
For the most simple methods of scraping you do not even need to know how to write code. And it is these methods that you will learn in this module.
Before we can get started we first need to understand the three basic methods for scraping data:
|
Data scraping |
This describes the extraction of data from documents or images. |
|
Web Scraping |
This describes the extraction of data from websites via the user interface. This form of scraping relies on the coding structure of a website i.e. HTML and XHTML. |
|
Programmatic scraping |
This describes the extraction of data from documents, images or websites, using a scripted computer program. To use this method of scraping, you will need to know how to code. |
The two methods we will address in this module are data scraping and web scraping.
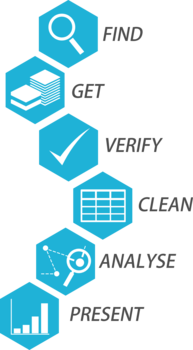
Image by School of Data
It doesn't matter which method of scraping you end up using, you will probably find that there is no guarantee when it comes to accuracy. After scraping, when opening the data in your spreadsheet or other processing tool, the data will need to be cleaned and possibly restructured.
In order to visualise data, we need to analyse it. And we cannot analyse it if it is dirty, data first needs to be cleaned. The first aspect of cleaning data is fixing data capture errors, and other anomalies. However, the second is very often the reshaping of 'scraped' data. Data that exists in table format on websites or documents is often structured quite differently to the way that 'clean' or analysable data would need to be structured.
This is particularly the case with pdf scraping, where a pdf scraper may misinterpret column or even row boundaries. We teach these data cleaning processes in our Source & Clean course.
Data stored in a PDF document is as useful as information written on a piece of paper. There is not much you can do with it until it has been extracted in a way that allows you to open it up in a spreadsheet software where it can be explored and processed.
PDFs present two challenges for data extraction.
Firstly, before we can make an assessment of which tool would best clear the obstacles preventing us from exploring or processing our data, we have to determine the format of the content within our PDF. This content can range between:
Secondly, we need to have a good idea of the different methods and tools readily available for extracting either of these formats.
Scraping from PDFs when the format of the content is either text or tabular data is much easier as the PDF contains content that can be easily identified and scraped.
The tool we would use to extract text or tabular data from a pdf is Tabula.
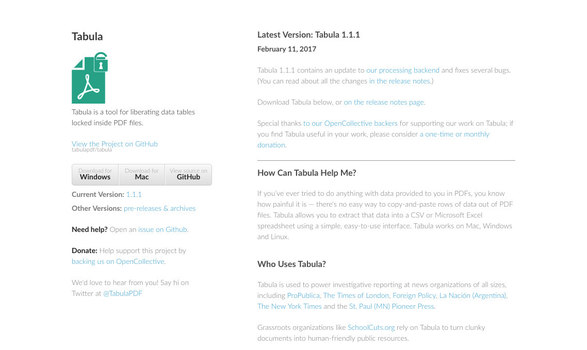
Tabula is a tool for liberating data tables locked inside PDF files. You can download it from the official website.
Please follow the installation instructions on the website or read the documentation for Tabula.
Usually when starting up Tabula, your web browser will automatically open. If it does not, open your web browser, and go to http://localhost:8080. Tabula works both online and offline.
Tabula runs by establishing a local server environment, which means that in order for it to run a terminal box will open up. The terminal box is the little black screen that pops up when running Tabula on a computer running on a Windows operating system. As long as the terminal is open, the program will be running. If you close this, you will terminate Tabula.
Tabula is really easy to use and make sense of. But before you can begin extracting data from your PDF, you need to upload the document from which you are extracting your data.
After uploading your PDF, using the click-drag method, select the border of the tables you want to extract.
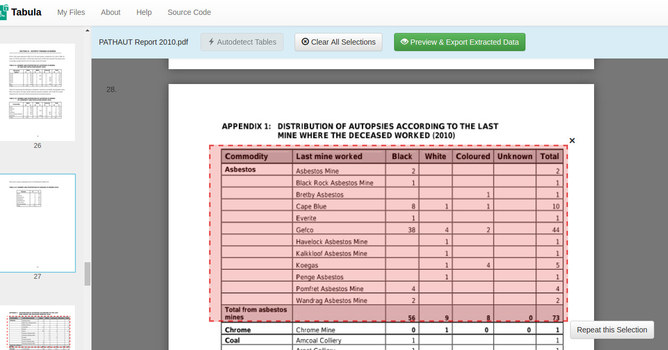
Tabula presents users with two methods for extracting tabulated data from a PDF. The first identifies individual columns based on white spaces while the second identifies columns based on borders or boundary lines. These methods are called "Stream" (whitespace) and "Lattice" (borders).
Make sure you have tested both of them to see which one presents your data the best. Double-check to see if you have selected all the information you wanted. Thereafter, you can export your document. You will be able to export your scraped data into CSV, XLS (excel spreadsheet), and JSON file formats. Once you have selected the format of your choice, click "Export".

Once you have downloaded your document, open it up in a spreadsheet software to verify that everything you require has actually been scraped from the pdf.
Scraping data from a PDF when the format is an image will require an optical character recognition tool. The tool we will use to scrape image content from PDFs and other image formats is OnlineOCR. You will learn about this in the next section.
To extract data from images we need a tool that supports optical character recognition. Optical character recognition can be defined as the process or technology of reading data in printed form by a device (optical character reader) that scans and identifies characters.
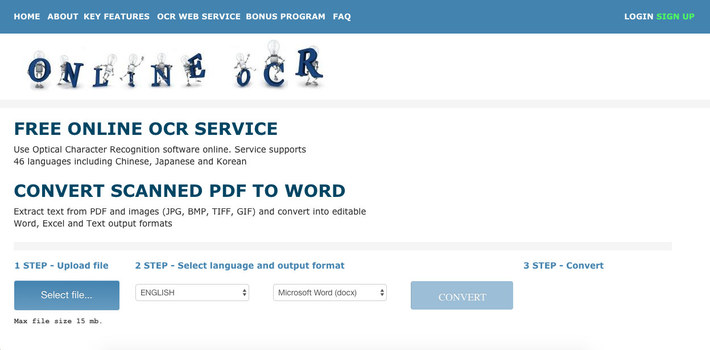
The tool we will use to scrape from images or scanned PDFs is OnlineOCR.
Extract text from PDF and images (JPG, BMP, TIFF, GIF) and convert into editable Word, Excel and Text output formats.


There are two methods we will cover for extracting data from the web, one is using the Google Sheets formula ImportHTML, while the other is using a visual scraping tool by Scrapinghub called Portia.
Using the ImportHTML formula, you are able to import data from a table or list within an HTML page.
Google Sheets offers many functionalities to import data, the most common being ImportHTML.
In order to make use of this Google Sheets formula, you require an activated Google account.
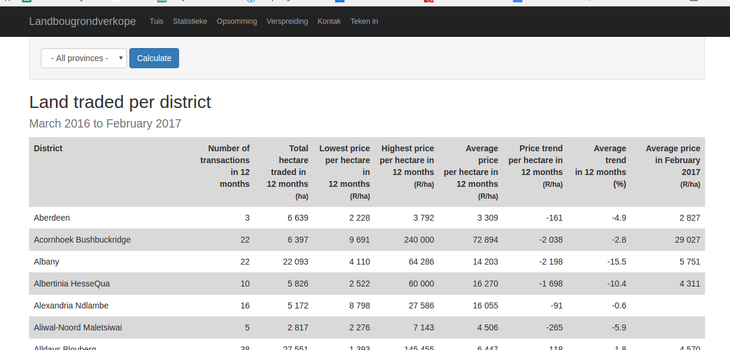
For the purposes of this tutorial, we are going to try to import the data for Western Cape province land sales using the following website.
Open a new Google Sheet and enter an equals sign = to activate the formulas field.
After the equals sign type importhtml. As with the use of all formulas entered in the formula field, it will be followed by a string of comma separated parameters contained within brackets.
The formula for ImportHTML is: IMPORTHTML(url, query, index)
Each of the parameters requires:
|
URL |
|
|
Query |
The type of object where the data is contained: a table in this case |
|
Index |
Which table are you going to scrape? First table, second table? |
Make sure you house the URL and Query parameters using double quotation marks " " as in the following example:

Once you have completed the formula with the correct information, hit enter. The data from the website will be imported into your Google Sheet.

Disclaimer: Despite the data being visible in your Google Sheet, it is still attached to the original source.
In order to detach this data from its original source we need to highlight the data. You can highlight the data by clicking in the top left corner of our spreadsheet between A column in 1 row. Once you have clicked this block, a drop down will appear. Select "Copy".
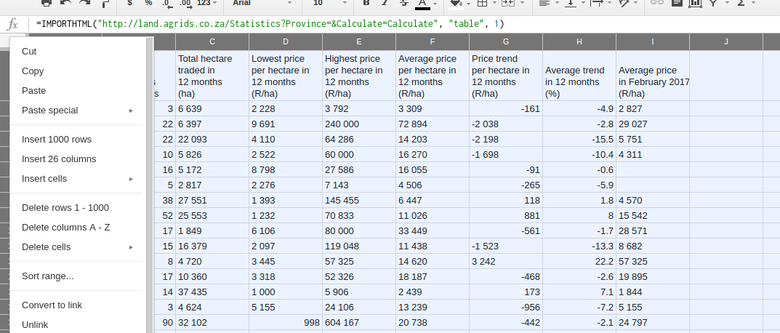
Thereafter, click the same block and then select "Paste" and choose "Paste special: Paste values only". The data you just copied will overwrite the imported data in the same place.
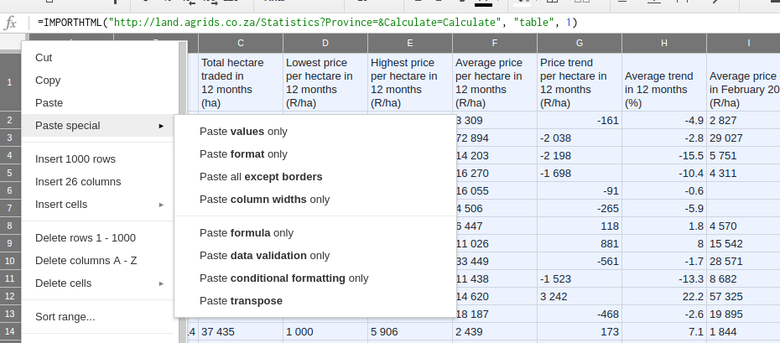
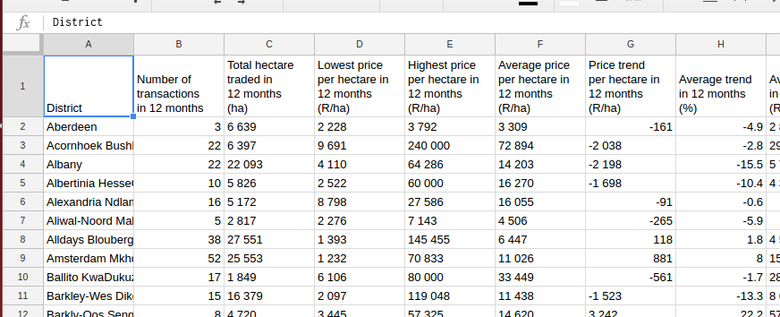
When the data is still attached to the original source, when selecting cell A1 pictured below, the formula field will contain the ImportHTML formula.

Once the data has been detached, if you select the same cell A1, the formula field will now display the the word "District".
For more information on the ImportHTML formula, read the documentation.
The next tool we will explore for scraping data from the web is the visual scraper by Scrapinghub called Portia.
Portia lets you scrape web sites without any programming knowledge required.
Create a template by defining elements on the pages you would like to scrape, and Portia will create a spider to scrape similar pages from the website. There is no need to download or install Portia as it conveniently runs in your web browser.
Visit the documentation for Portia 2.0. Portia is a product of Scrapinghub.
For the purposes of this tutorial, visit the City of Cape Town website pictured below.
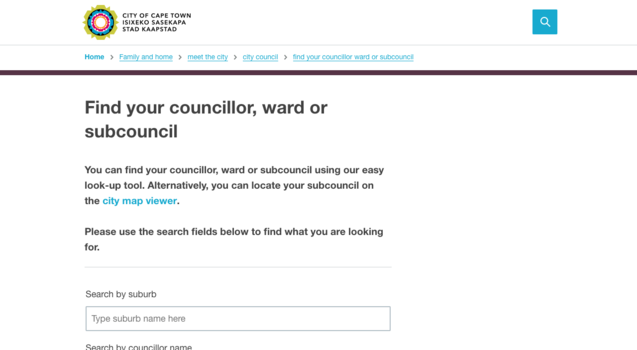
Now that you have access to the website you will be scraping, in a different browser tab or window navigate back to the scrapinghub website. In order to proceed, you need to register for a free account. You can sign-up easily using your Google account.
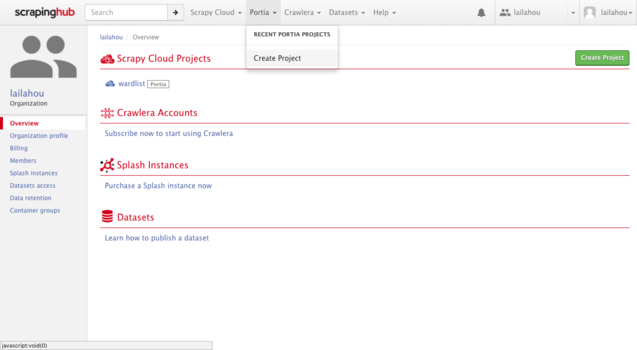
Once you have registered, login to your account. You will be using the Portia scraper to scrape a list of ward councillors from the City of Cape Town's website. On the top menu bar, navigate to the Portia dropdown menu and choose "Create Project".
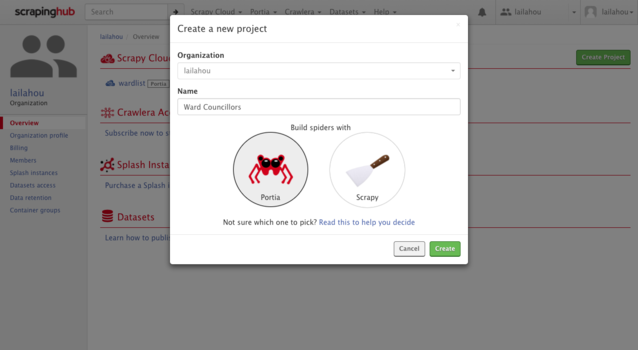
Once selected a popup titled "Create a new project" will appear. It will prompt you to enter the name of your spider and to select which platform you will use to build the spider. Make sure you have selected "Portia". Thereafter select "Create".
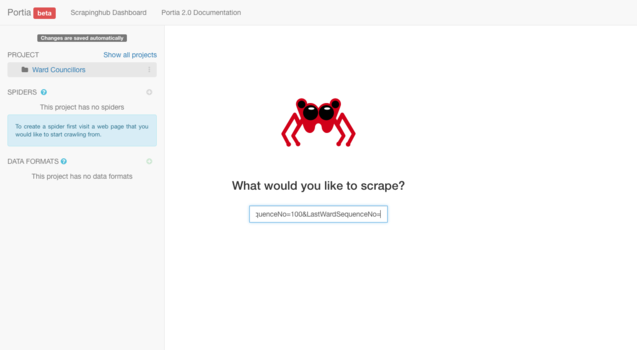
Now that your project has been created, before you can begin you will have to enter in a starting URL.
Navigate to the list of ward councillors on the City of Cape Town website. Copy the URL and paste it into the address bar within Portia as pictured in the example below. Most importantly, once you have pasted it be sure to hit the "enter" key on your keyboard.
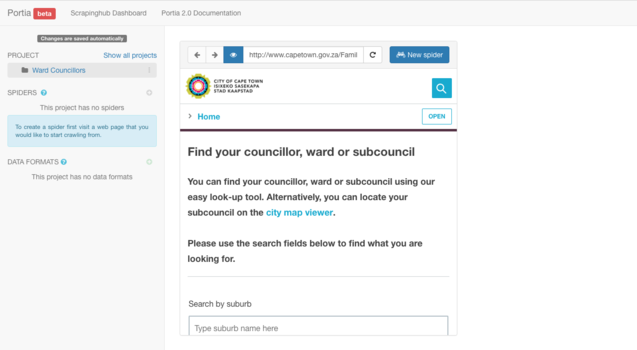
After hitting "enter" a window will appear displaying the contents of the URL you have entered in. Make sure the page you are on is the page you would like the spider to begin its crawl. Once you are happy, locate and click the "New Spider" button positioned alongside the address bar wherein you entered the URL.
After creating the new spider you will have to define a sample on which the spider can base its scraping activity. You can do this by selecting the "New sample" button located below the address bar wherein you entered the URL.
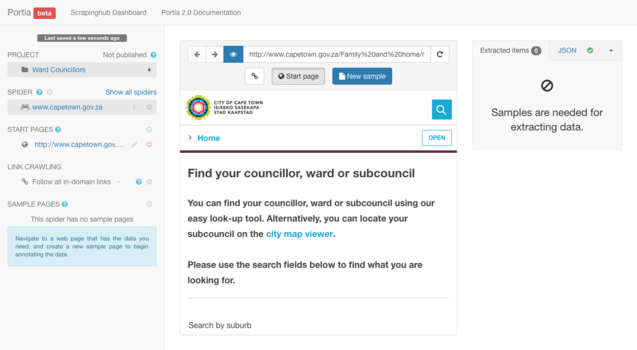
Once this has been selected it should automatically create the sample and access the "Edit Sample" area. The "Edit Sample" area consists of a menu bar with the following tools:
You will be selecting the sample areas you would like the spider to scrape. To do so you need to use the magic tool ![]() .
.
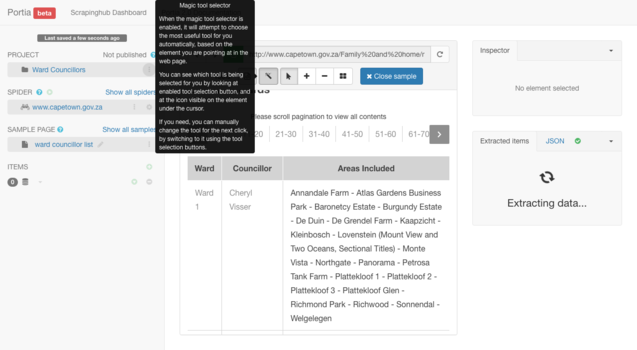
With the magic tool ![]() selected you are able to annotate your first data sample. Using the magic tool, hover over the first row in the first column in the ward councilor list table. This column is titled "Ward". You need to highlight the first cell below the heading cells. In this example the first cell contains the text: "Ward 1".
selected you are able to annotate your first data sample. Using the magic tool, hover over the first row in the first column in the ward councilor list table. This column is titled "Ward". You need to highlight the first cell below the heading cells. In this example the first cell contains the text: "Ward 1".
Upon hovering, the block's appearance will become highlighted. Click on it when in a highlighted state. As you click on it in this state, in the left toolbar you will be prompted to give this selected block of content a title. Type wardnumber then hit "enter" on your keyboard.
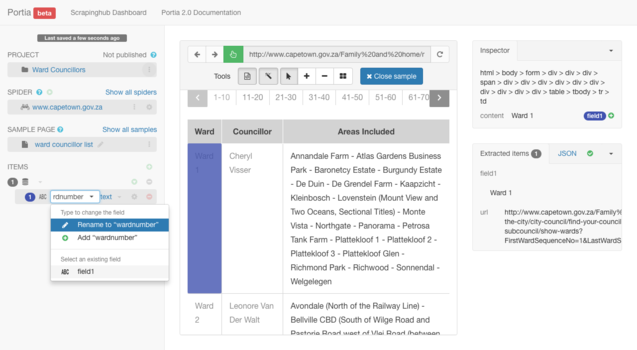
Because you are scraping a list you will need to make sure that you set the sample to include multiple entries. After naming your block wardnumber you can hover over the block below your originally selected block in your "Ward" column.
In doing so, Portia will give you the option of selecting multiple entries in this table. We recognise this by acknowledging the appearance of the "add repeat element" icon ![]() . Once this appears, you need to click on it.
. Once this appears, you need to click on it.
You know it has been set when the number that appears alongside our "wardnumber" title is changed from 1 to 10. This way we know it acknowledges all 10 entries displayed in the tabulated list on the City of Cape Town webpage. You can check this by locating "Items" on the left panel as pictured below:

Note: Always make it a habit to double-check the quantity of entries displayed on the sample page so that you are sure information you don't want to be excluded is left out during the scraping.
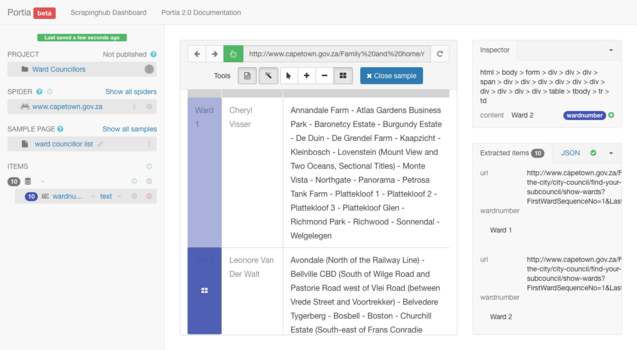
Duplicate your above activity for the next two columns.
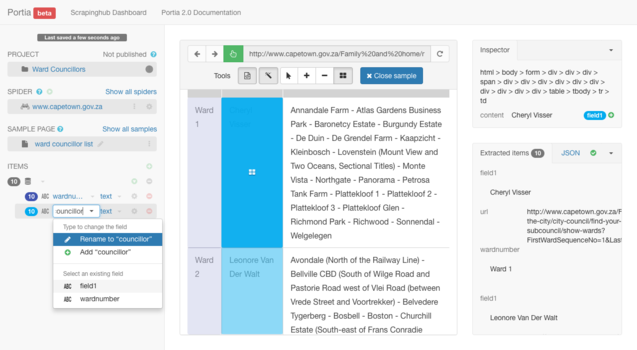
Once you are happy with your annotated sample, be sure to click "Close sample" located below the address bar wherein you entered the URL.
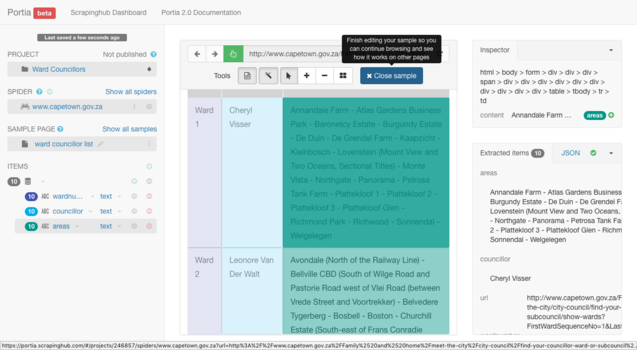
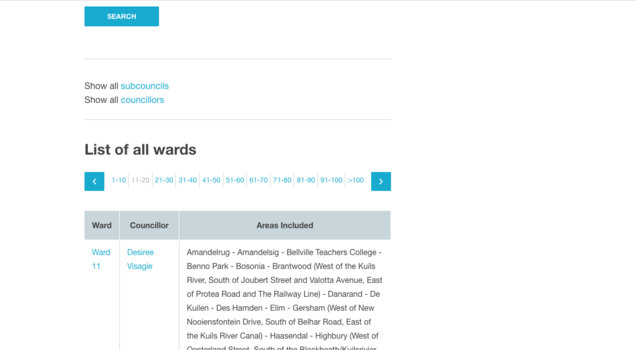
Now that you have defined the sample for scraping, you need to make sure that the spider knows what to crawl. The information is stored over a collection of pages that is navigated using the pagination links.

In order for the spider to crawl each of the links, you have to define a "generation URL". You can set this up by clicking on the "START PAGES" settings button located on the left panel.
Then select "Add generation URL".
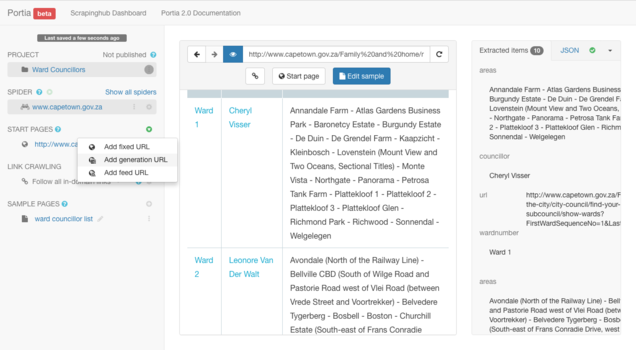
After selecting "Add generation URL", the URL Generation display box will appear. We make use of this by defining the URL structure to generate multiple URLs based on the structure of the paginated URLs.
In our example, the URL you will use is:
https://www.capetown.gov.za/Family%20and%20home/meet-the-city/city-council/find-your-councillor-ward-or-subcouncil/show-wards?FirstWardSequenceNo=1&LastWardSequenceNo=10
To define the structure, start by first defining the part of the URL that does not change. This would be everything preceding the number "10" in the above URL. But how do you know this? After browsing a few of the paginated links and comparing URLs, this segment remains unchanged, or rather, fixed.
https://www.capetown.gov.za/Family%20and%20home/meet-the-city/city-council/find-your-councillor-ward-or-subcouncil/show-wards?FirstWardSequenceNo=1&LastWardSequenceNo=
Now that you have added the "Fixed" fragment of your URL, in order to finish constructing the URL, you have to add an additional fragment.
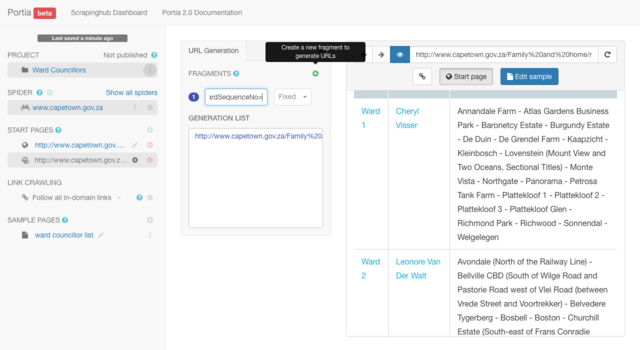
The next part of the URL to define is the fragment that does change from link to link.
The pagination follows a numbering system whose count ascends at intervals of 10 each time. For example: 1-10 | 11-20 | 21-30 etc.
After browsing a few of the paginated links, you know that the pagination begins at 0-10 and ends at >100, and that 10 to 20 to 30 is not consecutive numbering i.e. it is not 10, 11, 12 etc. it jumps at intervals of 10.
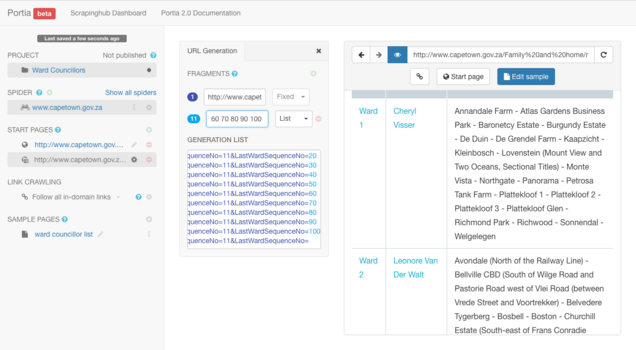
As a result of this, you cannot select the "Range" option for the next segment of the URL but will have to use the "List" function. The "Range" option only works for consecutive numbering or lettering i.e. if the pagination uses the alphabet for navigation.
The list function works by defining individual values to be added onto the end of the fixed fragment of the URL. The list function's structure requires that each value is separated by a single blank space, and should be written as follows:
Value1 Value2 Value3
For the example, your values would be:
10 20 30 40 50 60 70 80 90 100
After checking what the URL looks like for the >100 page, we notice that it does not have a number but rather is a blank space. So I will add an additional blank space after the 100 value in my list so I can accommodate for the final >100 page to be included in the scraping process.
Be sure to browse the box titled "Generation List" to assess whether a complete list of paginated URLs has been generated.
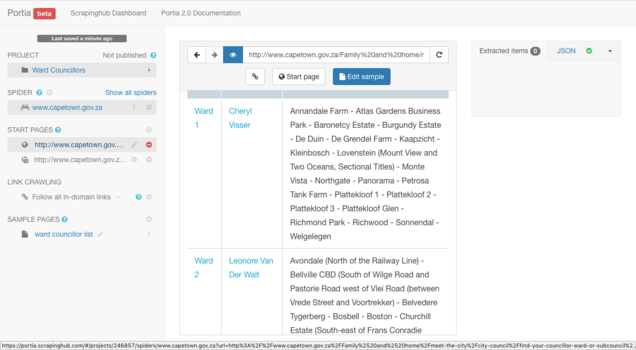
Next you will have to remove the original start page while retaining the newly added start page you have just created through the "Generation URL" function.
You can achieve this by locating "START PAGES" in the left panel. Next to the original start page, titled by its URL, will be a red circular disc with a negative - sign in it. Click on this red disc to remove the start URL item you no longer need.
Now that you have defined the URLs that need to be scraped and you have removed the original start page URL, you must deactivate any automated link crawling. You do not need this because you have already clearly defined every URL your spider has to crawl to extract the data you are scraping. In order to deactivate any automated link crawling, locate "LINK CRAWLING" on the left panel. Expand the dropdown menu and choose the setting: "Don't follow links".
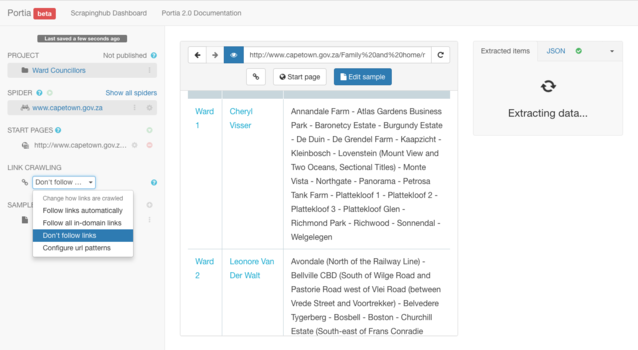
Once you have set the spider to not follow links be sure to click the project menu (project currently titled "Ward Councillors") on the left panel and select "Publish Project".
You will not be able to run the spider if the project has not been published. After the project has been published, navigate to the top bar and select "Scrapinghub Dashboard".
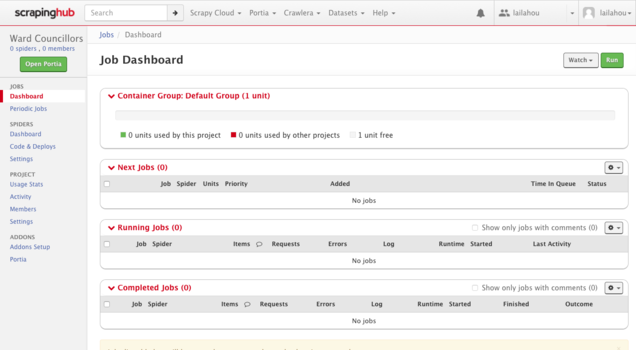
On the far right there will be a green button titled "Run". Select "Run" and wait for a popup to appear. Under the heading "Spiders" select the spider you just created. Once you are happy, click "Run".
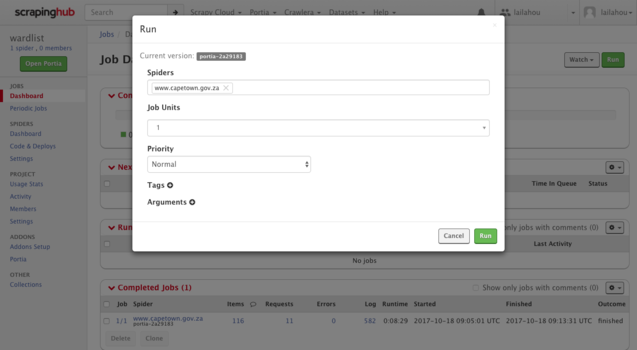
The popup will disappear once you have clicked "Run" and a new job will be added to your dashboard. You can track the progress for the new job under the heading "Running Jobs".
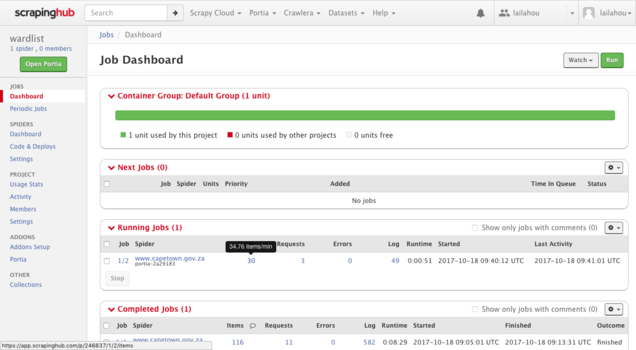
You can access the scraped data by clicking on the hyperlinked number appearing below "Items" located as a heading under the "Running Jobs" panel. Here you can access all job-related details, progress, and settings pertaining to your spiders scraping activity.

Once the job has completed, you can navigate to the far right of the screen and download your data in CSV, JSON or XML formats by selecting the green button labelled "Export".
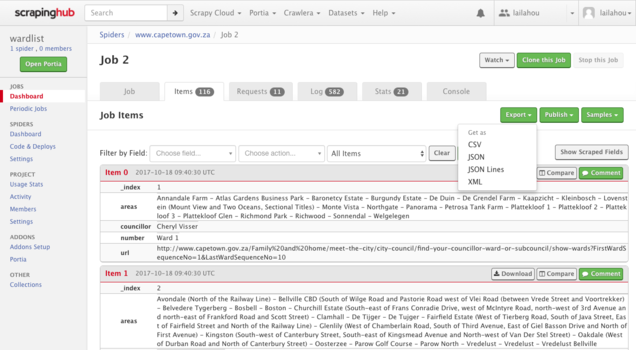
Thereafter you can open it up in the spreadsheet software you will be using to process your data.
This curriculum has been developed by OpenUp in collaboration with School of Data.
That's great to hear! We want to make it even better and could really use your feedback.
How will you apply what you learned?
You are free to use, share, and adapt this content to your needs. Do you want to teach others? Let us know how we can help.
We're sorry to hear that.
Please let us know how we can improve.